A summary of all the information required to perform a hair spa at home.
Unknowingly or not, we put our hair through a lot of stress from our daily activities, which leads to a lot of hair problems like hair fall, dandruff, dull, and frizzy hair. A hair spa is a remedy that can address all of these problems. It’s typically a salon service, but it will set you back a lot of money. Choosing a hair spa at home is a more affordable option. This will give you the same outcomes without draining your bank account.
The procedures for performing a hair spa at home differ slightly from those at salons. Generally, it involves oiling, steaming, washing off hair, and then a hair mask. After completing all of the steps, your locks will be softer and shinier, and your scalp will be revitalized and squeaky clean. Furthermore, if you’re looking for a relaxing pampering session on the weekends, a home hair spa should be your first choice.
What are the steps in a home hair spa?
Prepare your hair
Start by detangling your hair using a wide-toothed comb or brush. Remove any knots or tangles gently to avoid hair breakage.
Oil Massage
The first step in your at-home hair spa routine is hair oiling, an ancient ayurvedic practise. It functions as a pre-shampoo treatment and has the ability to nourish hair cells, enhance scalp blood flow, and detoxify the area, all of which are crucial for promoting healthy hair growth. The advantages of oiling hair don’t stop there, though, as it also helps to tame frizz and shield hair from heat and pollution damage.
You should select the best oil for you based on the texture of your hair and your concerns to get the most benefits. It is best to combine different hair oils if you want to address multiple hair concerns because different hair oils contain different nutrients and vitamins. Castor, coconut, and olive oils are combined to give you strong, lustrous hair with lots of volume.
Apply the remainder of the oil to your hair strands and their ends after concentrating on giving your scalp a thorough massage for 5 to 10 minutes. Allow it to work on your scalp and strands for 20 minutes.
Here is a chart showing which kind of oil to use on various hair types:
Argan oil: This oil is a great option to add moisture and hydration to hair and is excellent for frizzy, dry, and brittle hair. It eliminates dry scalp thanks to its lightweight texture without making it feel greasy. Another noteworthy advantage is that the oil gives hair shine and shields it from UV ray damage.

Olive oil: This oil is an excellent treatment for people who are prone to dandruff and dull hair because it works well to soothe flakes and moisturise a dry scalp. It can help with dandruff and hair growth when applied to the scalp.

Sesame oil: The most effective treatment for excessive hair loss and early greying is sesame oil. It can help those who are experiencing baldness and strengthen weak, brittle hair thanks to its high antioxidant content. As it preserves the natural colour of hair, it also has the ability to darken hair.
Hot towel / steaming of hair
1. Hot towel
The pores on your scalp will open up during this step, allowing the oil to be absorbed as fully as possible while ensuring that the nutrients from the oil reach deep into the cuticles. You can either use a hot towel to wrap around your head or steam your hair for 10 to 15 minutes. Simply soak a soft, dry towel in hot water, squeeze out the excess, and repeat as necessary. If you have extremely dry hair, extend the time to 15-20 minutes. Leave this on for 5-10 minutes.
2. Steam machine
The following procedure, steaming, makes sure that the oil you previously applied seeps deeper into the hair strands, enabling it to more effectively absorb the oil’s nutrients. Overall, it will give hair an extra layer of hydration and nourishment and make it feel incredibly soft. But if you choose to do a hair spa at home, you don’t need any fancy steaming gadgets to reap the benefits; all you need is a hot steaming towel wrapped around your head in a turban-style for a few minutes.
Wash and condition your mane
After that, wash your hair and rinse the oil out. To do this, it is highly advised to use a Sulphate-free shampoo because they effectively cleanse your hair from the inside out without robbing it of its natural moisture. When looking for a shampoo, stay away from products that contain SLS, SLES, Sodium Lauryl Sulphate, or Sodium Laureth Sulphate. Less is more when it comes to clean shampoos, so dilute it with water and just rinse and repeat! Even though a clean shampoo may not produce as much lather, it still effectively cleanses your hair and keeps moisture in it.
Nourish hair with a hair mask
The most crucial step in your at-home hair spa treatment is this one. Rich ingredients found in hair masks, such as natural oils and antioxidants, have the power to repair damaged hair. It tames frizz, lessens breakage, fortifies hair, and improves hair’s general health.
Selecting the one that best addresses your hair concerns is crucial because each of them is designed to treat a particular type of hair damage. An intensely nourishing mask will work best on hair that is dehydrated and dry, while any protein-rich mask will work best on hair that has undergone chemical treatment.
For a natural hair spa at home, you can either select over-the-counter hair masks or gather ingredients from your kitchen to make your own mask. For best results, leave the mask on for anywhere between 20 and 30 minutes before rinsing it off with lukewarm or cold water.
Conditioner
After that, continue with your usual conditioning routine. Apply the conditioner from the middle of your hair to the tips using a coin-sized amount. Never apply it close to the scalp because it can easily become greasy and because the hair there is generally healthier and newer, necessitating less maintenance than the tips. Allow it to absorb completely for a minute, then rinse it off.
Serum
The application of a serum is the final but crucial step. This assists in detangling, controlling frizz, and smoothing out the hair. Apply the serum towards the middle and ends after taking one or two pumps. Be cautious and watch out not to overdo it as this can quickly make your hair greasy and oily!
Hair spa at home for frizzy hair: Olive oil and yoghurt mask
The mask treats dull, dry hair while restoring moisture and bounce, which prevents frizz. Yogurt’s lactic acid will moisturise your dry, parched hair strands and remove any buildup of dead skin cells on the follicles, whereas olive oil will add shine and smoothness to your hair.
Hair spa at home for dandruff: Brown sugar and coconut oil
Itchy, dry scalp can be treated with this hair mask. As coconut oil gets deeper into the hair, it stimulates hair growth while the granules in brown sugar gently exfoliate away the flakes. It fights against head lice in addition to dandruff. When applying it, concentrate more on the scalp and give it a thorough massaging.
Hair spa at home for hair fall: Honey and milk mask
Choose this natural mask if you’re having a home hair spa treatment to stop hair loss. Honey contains keratin, which supports hair strength and shields brittle hair from harm. By encouraging cell regeneration, it also promotes a healthy scalp. Additionally, milk’s composition of proteins and lipids strengthens your hair even more and controls hair loss. Additionally, after use, the iron, Vitamin B12, and zinc in it give hair softness and shine. Apply the mask, then leave it on for 20 minutes before rinsing.
Benefits of hair spa
Enhances blood circulation: During the hair spa procedure, there are numerous massages that stimulate the scalp’s blood flow. This maintains the health and strength of the hair follicles by increasing the blood’s supply of nutrients and oxygen.
Unclogs scalp pores: The silicones in your hair care products and environmental impurities are to blame for clogged pores, which cause a variety of problems with your hair, including infections and slowed hair growth. The quality of your hair is improved by a homemade hair spa, which gets rid of all the substances that have built up in the pores.
Rebalances sebum production: An imbalanced sebum production by the sebaceous glands beneath the scalp can result in either a dry, itchy scalp or an oily, dust- and dirt-attracting scalp. Home hair spa treatments will balance sebum production so that neither too much nor too little is being produced.
Repairs damaged hair: To treat frizz, dryness, and dehydration of the scalp, the hair spa treatment is enhanced with many moisturising ingredients. Your hair will receive deep conditioning from it, which will repair any damage and replenish any moisture that has been lost.
Remove impurities & dandruff: Daily exposure to the effects of pollution, dust, heat, and so many other things can lead to the buildup of impurities in your hair’s follicles and cuticles. A hair spa aids in removing these impurities, clearing the pores, and getting rid of dandruff accumulation.
Learn hair spa
How often should you so a home hair spa?
To give your hair the proper nourishment and care and to see noticeable results in terms of hair texture, quality, and growth, it is best to treat yourself to a home hair spa at least once every 15 days or twice a month.
So if you want to see noticeable, tangible results over time, put your time and effort into the proper hair care. Make it a regular ritual that you participate in, and you’ll not only come to enjoy it but also look forward to engaging in it as a deeply relaxing ritual.
Remember, it’s important to choose hair care products that suit your hair type and address your specific concerns. If you have any allergies or scalp issues, it’s best to consult a dermatologist or hair care professional before trying any new products or treatments.
Buy Mygate smart locks
Activation of E-Invoicing marks the movement of society towards a serious billing flow. Since the invoices are declared to the GST authorities in real time, it becomes crucial to curate all the details before actual billing. To help our customers, we publish error messages and block the invoicing process in case of insufficient data.
Here are messages you might see while generating e-invoices. And the reason why you’re seeing them.
1. Mandatory HSN Submission
The following two conditions – Template Creation & Penalty Setting – are validated along with the mandatory buyer and seller details before allowing you to go forward with the billing process. HSN submission is mandatory for both of them.
2. Count of B2B Houses
The count of B2B houses configured with the amount within the template is displayed during the generation process to remind the user about the E-Invoices being generated.

3. E-Invoice Label
The E-Invoice label appears alongside the batch ID number in case the batch contains a house that is GST registered. The E-Invoice Alert label appears alongside the batch ID number in case the batch has not been completed or failed with an IRN generation.

4. Aggregate Counts
The aggregate count of the B2B houses and IRN numbers generated is displayed on the details page of the batch ID.

5. B2B Labels
The GST-registered houses are denoted with a B2B label alongside their names.

6. IRN Entries Tracker
With an IRN entries tracker, you can easily track and monitor the status and movement of e-invoices vis-a-vis IRN numbers. This enables better visibility into the invoice lifecycle, including invoice generation, submission, acceptance, and retrials in case of failure. It helps you stay organized and maintain control over your invoicing processes by offering various filters of flat, status, request & document types, etc.
In the latest development of the government’s initiative to shift to an e-invoicing model, the Finance Ministry has issued a notification dated May 10, 2023, stating that any GST-registered entity having turnover of more than Rs. 5 Crore in any financial year from 2017-18 will be required to comply with the e-invoice provisions with effect from 01st August 2023 i.e., they will be required to generate IRN/e-invoice against all B2B transactions.
How to activate the E-invoice system?
Given the fact that B2B invoices should preferably be declared to the GST authorities on a real-time basis, you must ensure that all details surrounding the parties and invoice items are correctly updated on the dashboard. Here MyGate dashboard is functioning as the Application Services Provider (ASP) to build a direct link between your society and the GST Suvidha Portal.
Step 1: API User Registration
For the MyGate dashboard to be used for e-Invoicing, you must register the society onto your GST portal as an API user. Once registered you’ll be provided with an API ID and password against your GSTIN that should be shared with MyGate to allow linkage with the GST portal.
Download the booklet to read more on how to register as an API user
Step 2: Feed in your details
As a society admin, it is mandatory for you to submit the following details under the Maintenance & Account Settings section:
- Society GSTIN
- Society Registered Name
- Society Address
- Society Pincode
- Society Location (city associated with the mentioned pincode)

Step 3: Ask Buyers to feed in the required information
The following details are mandatory for all the GST-registered houses and other debtors to submit under the Billing Details section:
- Debtor GSTIN
- Debtor Registered Owner Name
- Debtor Billing Address
- Debtor Pincode
- Debtor Location (city associated with the above pincode)
- Debtor Place of Supply for Goods or Services (to decide between CGST/IGST billing)

To ensure data sanctity for all B2B buyers, the following alert message will be displayed in case of any information discrepancy.

Step 4: Submit the Invoicing and Penalty Details
While the rates and quantities for the invoice items along with their GST rates and values are handled by the invoicing system directly – it is mandatory for you to provide the HSN/SAC codes. The latter should also be updated to the individual penalty settings associated with the billing templates.
Step 5: Activation of the E-Invoice system
The API User Id and password are essential for the activation of the E-invoice system. Entering these credentials into MyGate’s invoicing system is deemed as explicit consent to the ERP software to be able to raise E-Invoices for the seller.
We perform a test authentication call to the GST portal to verify the credentials before turning on the switch for E-Invoicing. Society must either be on a provisional penalty system or a subsequent invoice penalty system.
How to generate E-Invoices?
MyGate offers various entry points to generate member/non-member invoices to cater to the different use cases –
- If the society wants to generate invoices for multiple houses/non-members at once then the Group Invoice feature can be availed.
- If the society wants to generate an invoice for a particular house/non-member then the “Add Charge” feature is preferred. (Do not use this if the society works on bill plans or if there are multiple items on the concerned invoice)
- Societies levying provisional penalties onto their defaulting houses/non-members would find the ‘provision to tax conversion’ happening either automatically or through a tool on the dues summary page on the dashboard.
Group Invoice
Most of the billing occurs through the group invoicing section. Post configuration of a template, it can be used as a draft any number of times. The society can even enable automated periodic generation settings on a template to enable monthly/quarterly invoicing without any manual interference.
As billing flow has not changed in any way, society just has to be wary of adding any incorrect supporting information for the B2B houses involved in the generation process. For example, the non-GST items in the template have to have their proper HSN/SAC codes, given that each value is properly validated by the GST portal.
If there is incorrect information for a B2B house, the IRN and QR generation for that specific bill would fail. That one bill should be canceled and a fresh invoice must be generated for the house after data correction.

Add Charge
This is a quick invoicing tool presented on the dues page of all the houses/debtors. Due to its restricted nature, it is able to generate a single-item invoice whenever necessary.
Again, the usual billing flow has not changed in any way. Data-related cautiousness needs to be maintained.
Provisional Penalty Conversion
Receipt-based automatic conversion: The provisional penalty system in MyGate does not book income and attract GST liability until the penalty value is paid by the debtor. Upon payment, the penalty tax invoice is generated automatically alongside the receipt, and an IRN call is triggered by the software.
Bulk manual conversion: If a society deliberately wants to show the impact of the penalty on income, this is ideally done once a month or at the end of the financial year to keep simpler records. A conversion tool to address the same is offered on the dues summary page. This single-click operation can convert provisional entries of penalty into tax entries in bulk.

Validations to be kept in mind before generating any E-Invoice
- Ensure all B2B houses have their GST numbers configured along with address, pin code, location, POS, and registered owner names.
- GST number cannot be a dummy or incorrect value
- Pincode should belong to the same state as the GST number
- The location should be in plain text and match the pin code provided
- POS should exactly match the state code for service/goods supply
- The address cannot be more than 100 characters in length
- Ensure the seller has their GST number configured along with address, Pincode, location, and registered owner names. The other details mentioned in pt 1 apply here as well.
- If the seller and the buyer belong to the same state, an IGST invoice CANNOT be pushed and vice versa.
- HSN CANNOT be missing within any invoice item (whether the item attracts GST or not) or the penalty settings
- While dealing with the IGST houses or non-members, the society would need to create a separate template from the GST and non-GST registered parties.

Cancellation of E-Invoices
The GST authority mandates that the cancellation of a B2B E-Invoice/credit note must happen within 24 hours of its generation. Hence, we fetch the exact IRN generation time from the Suvidha Portal and allow cancellation until 23 hours 58 minutes to accommodate for safety.
Secondly, the ‘Delete’ button that appears on the latest batch generated also becomes non-functional in case the concerned batch contains an E-Invoice. This fail-safe ensures that no declared documents are accidentally hard-deleted and lost.
All invoices generated through group invoicing (whether manual or automated) sit under the group-generated charges in the invoice history. A ‘Cancel’ button is provided with each invoice batch that can be used to trigger the cancellation of the IRNs generated within that particular batch.

All invoices generated through add charge within the house/non-member dues page sit under the other charges in the invoice history. A ‘Cancel’ button is associated with each invoice that can be used to trigger the cancellation of the IRNs generated within the batch.

Reversal of E-Invoices using Credit Notes
When a transaction needs to be reversed, such as due to order cancellations, returns, or adjustments, you can reverse the original e-invoice using a credit note. The credit notes are required to be linked to the original e-invoice through its unique Invoice Reference Number(IRN). MyGate dashboard ensures this efficient linkage for the reversal to be properly connected to the original transaction for reconciliation purposes.

IRN Entries Tracker
With an IRN entries tracker, you can easily track and monitor the status and movement of e-invoices vis-a-vis IRN numbers. This enables better visibility into the invoice lifecycle, including invoice generation, submission, acceptance, and retrials in case of failure. It helps you stay organized and maintain control over your invoicing processes by offering various filters of flat, status, request & document types, etc.
Deactivation of the E-Invoicing System
You can reach out to the MyGate team for the deactivation of the E-Invoicing system. To ensure clarity around the previous IRN generations –
- The batch IDs will continue to carry the E-Invoice and generation pending labels.
- The aggregate counts of B2B houses and IRN generations would still be presented in the batch detail on the page.
- The invoices for the GST-registered houses would continue to display the IRN and QR codes.
The B2B label on the GST-registered house’s dues page will be disabled along with the various validations we do for any type of invoice generation.
The Indian government has been shifting to the e-invoicing model to prevent tax evasion and improve the transparency of the taxation system. In the latest implementation of the same policy, The Finance Ministry has issued a notification dated May 10, 2023, stating that all GST-registered entities with a turnover of ₹5 crore or more will be required to adopt e-invoicing for all B2B transactions from August 1, whereas the current threshold stands at ₹10 crores. Societies that fail to comply with the regulations after August 1, 2023, will be penalized with 100% of the tax due or 10,000 Indian rupee, whichever is higher.
Does your society qualify for E-invoicing?
Any society registered under the GST regime and having turnover of more than Rs. 5 Crore in any financial year from 2017-18 will be required to comply with the e-invoice provisions with effect from 01st August 2023 i.e., they will be required to generate IRN/e-invoice against followings: –
- Each tax invoice, debit note & credit note is issued to the registered person.
- Export Transactions
Kindly note that for any society, all maintenance services are offered by the seller which in your case could either be an RWA, a builder, or an FM company with the possibility of their annual turnover being 5 Crores.
What is B2B E-invoicing?
E-invoicing is a system of electronically capturing and validating the invoice details between the seller and the buyer. The objective of E-invoicing is to streamline the invoicing process, reduce errors, enhance transparency, and facilitate the seamless flow of information among societies and tax authorities. It helps prevent tax evasion, as the invoice data is directly reported to the GST portal, enabling real-time monitoring and validation.
It aims to improve the efficiency and transparency of the tax administration as well as reduce errors and fraud. Hence, a B2B Invoice, in your context, is a document for proof of sales that a GST-registered society shares with a GST-registered house/debtor in exchange for the services or products provided.
How does invoice reporting work?
As with many other countries adopting the system, adherence to the laws and correctly formatting the invoice is essential. Understanding how the electronic invoicing system works is the first step to avoiding common mistakes during the e-invoicing process.
Invoice Generation: The seller generates the invoice using any accounting or billing software that is integrated with the GST portal. The invoice is assigned a unique Invoice Reference Number (IRN) and a QR code.
Validation and Authentication: The generated invoice details are sent to the Invoice Registration Portal (IRP) for validation. The IRP validates the invoice and provides a digitally signed QR code, also known as the Quick Response (QR) code.
Invoice Sharing: The seller shares the e-invoice with the buyer, either by providing a copy or by uploading it to the buyer’s accounting system.
Reporting to the GST Portal: The details of the e-invoice are reported to the GST portal, which enables the automatic generation of the buyer’s tax return and allows reconciliation of the input tax credit.
How is E-invoicing distinct from normal invoices?
So far societies have been generating invoices or credit notes for all houses and declaring their income to GST authorities the next month with the R1 fling. The same process has to continue for the GST-unregistered houses.
However, for the GST-registered ones, the income declaration must happen along with or preferably within two days of the invoice generation. In response to this, the GST authorities will provide a Unique Invoice Reference Number (IRN) for each bill or a credit note against a bill. The IRN along with its associated QR code MUST be printed on the invoice/credit note PDF for it to be qualified as an e-Invoice document.
Benefits of having an E-invoicing system
Generating an e-invoice is usually the responsibility of a taxpayer who reports to the IRP in GST. Next, the IRP will generate a unique IRN and an OR code (optional). The taxpayer will be able to scan this GR code, extract the IRN, and fetch invoice deals.
Here are some benefits of e-invoicing for societies:
- E-invoicing helps you with data reconciliation and accuracy
- during manual data entry.
- It allows interoperability across societies.
- Real-Time E-invoice Tracking
- The e-invoice details will be auto-populated on tax return forms
- and e-way bills, making the tax return process easy.
- All transaction details will be available online at all times. This.
- would eliminate the need for frequent audits and surveys.
- Differences in data can be caught by comparing input credit and
- output tax.
- This initiative will also build efficiency within the tax administration by
- helping to identify fake invoices.
How will e-invoice help in controlling tax fraud?
The e-invoicing system will curb tax fraud in the following ways:
- With the implementation of e-invoicing, tax authorities will have access to all their transactions as they have to be uploaded on the GST portal.
- Manipulating invoices will not be easy as they will have to be generated before the transaction takes place. The system will allow you to spot fake invoices easily by matching the input tax credit with the output tax details on the GSTN portal.
At Mygate we are committed to ensuring that your safety is never compromised. That’s why we want you to know that your visitor management system never goes to sleep even in the face of network disruptions guaranteeing uninterrupted security.
What is Always On Mode?
The Always On Mode ensures that key security features, such as access control and visitor management, continue to operate seamlessly during network disruptions. Our system is designed to detect the availability of network and system failures & automatically move the operations to the offline mode. This allows for recording of the visitor data on the guard device itself i.e. residents, staff, guests & non-invitees can enter and exit your premises smoothly as usual.
Benefits of Always On Mode
-
- Uninterrupted Security: Visitors will experience a consistent and secure check-in process, irrespective of any temporary disruptions in network connectivity.
-
- Data Integrity: All data collected during offline mode on the guard app is securely stored and synchronized once the network connectivity stabilizes. This guarantees that your records are accurate and available on both the admin dashboard and the resident app.
-
- Always Prepared: With the impressive 6 hours of offline operation capacity, we ensure that your community remains safe and connected even during extended periods of network downtime.
-
- Reliable Documentation: Records both passcode & non-invite entries without any lapses & eliminates the need for guards to return to manual record-keeping during outage hours.
-
- Seamless Security experience: No matter the circumstances, your society’s security operations will remain active and vigilant.
Stay connected, stay secure, and enjoy the peace of mind that comes with Mygate’s Always On Mode. Should you have any questions or require assistance, our dedicated support team is always ready to help.
Efficiently managing amenities within a residential society is no small feat but with the help of Mygate’s comprehensive suite of unique features, society admins can effortlessly streamline the management of amenities and thereby optimize resident experiences. From restrictions on booking frequency to enforcing penalties on misuse, Mygate equips admins with all the tools they need to create a harmonious and seamless amenities management system.
Maximum days in a month per flat
Limit monthly amenity bookings per house
Did you know that Mygate allows you to set a cap on the number of days a house can book an amenity within a month? This helps distribute access equitably, ensuring a level playing field for all your residents.

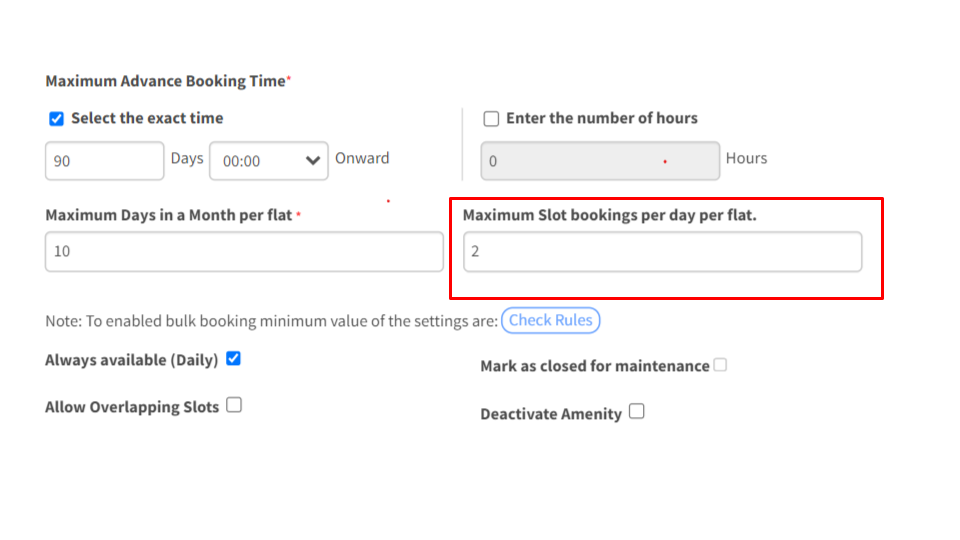
Maximum slot bookings per day per flat
Enforce daily slot limits per house
You can also set limits on the number of slots a house can book for a particular amenity per day preventing a single household from hogging the slots & ensuring a fair chance for all to access without any undue advantage.
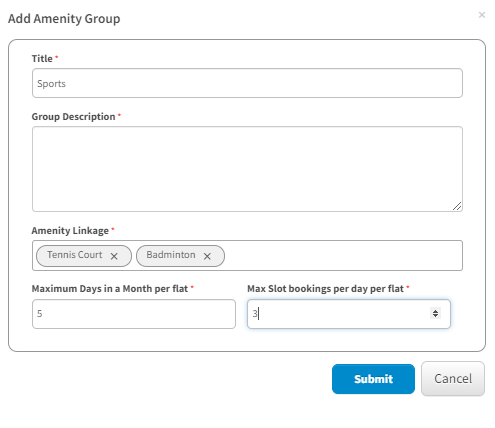
Add amenity group
Group similar amenities to discourage amenity hogging
And that’s not all, Thanks to Mygate’s intelligent grouping feature, you can group similar amenities to discourage one house from hogging multiple amenities simultaneously ensuring everyone gets a chance to experience different offerings.
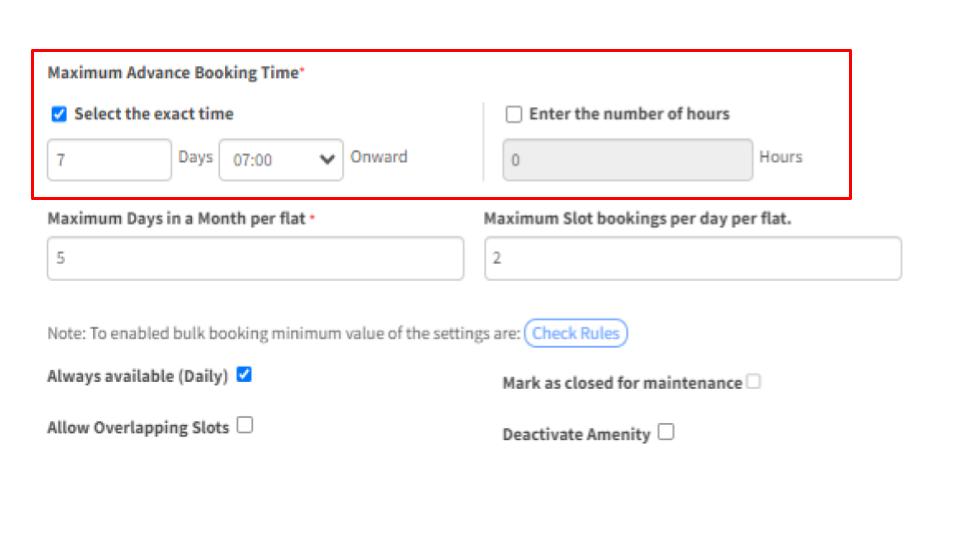
Maximum advance booking time
Set a specific time-frame for advance bookings
What’s More? Prevent unnecessary or far too advanced bookings by placing restrictions on how many days or hours in advance residents can book amenities. This will prevent undue hoarding of slots & ensure a smooth and conflict-free experience for all.
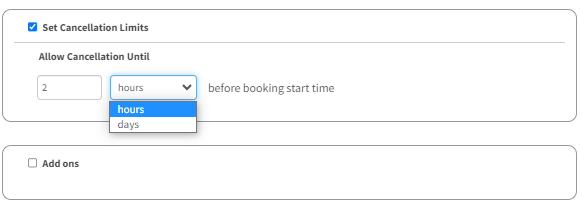
Set cancellation limits
Implement a non-cancellation period before a slot begins
There’s more good news! Enforce a stringent non-cancellation period prior to fixed slot in order to avert last-minute cancellations, ensuring residents only make reservations they intend to honor, enhancing efficiency and fairness in amenities management.
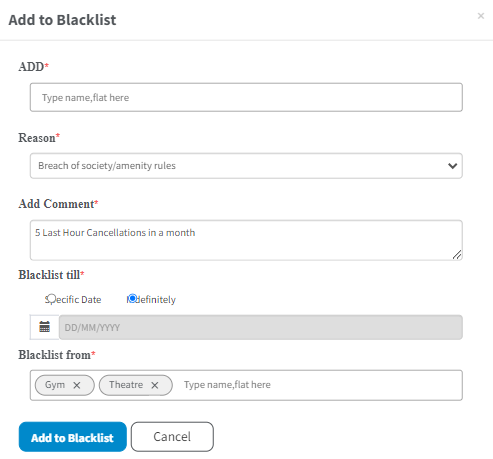
Add to blacklist
Debar residents for misuse or no-shows
But here’s the real game changer, instill accountability & block residents from future bookings as a penalty for misuse or no-shows ensuring that everyone respects the amenity booking system & utilizes the amenities responsibly.